

The Rower's Guide to Blisters: Prevention, Care, and Callus Management
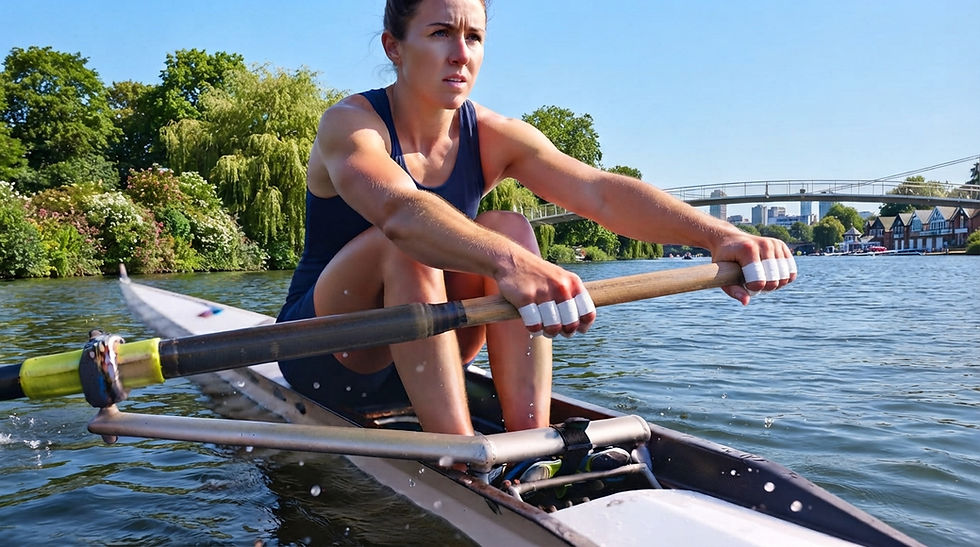
Every athlete who steps into a boat or sits on an ergometer quickly learns that rowing is a sport defined by contact points. Of those contact points, none endure as much repetitive shear force as your hands. Blisters are often viewed as a rite of passage for rowers, but untreated friction wounds can derail training, lead to severe infections, and ruin your technique. Managing your hands is just as critical as managing your split time.
What Are Blisters?
A friction blister is a localized, fluid-filled pocket that forms between the upper layers of skin—specifically between the stratum corneum (the outer protective barrier) and the underlying epidermal tissue. When skin undergoes repeated friction and pressure, the cellular bonds linking these epidermal layers break down. Serum, plasma, and extracellular fluid accumulate in the damaged gap, creating a cushion designed to protect the deeper tissue from further trauma.
Why Do Rowers Get Blisters?
Rowing presents a unique physical environment where friction, moisture, and repetition intersect. The main causes include:
Repetitive Friction: A standard 5,000-meter piece involves roughly 500 strokes. Over miles of training, the constant rolling, feathering, and squaring of the oar handle generates massive shear stress on skin tissue.
Moisture & Sweat: Water from river splash and sweating palms softens the skin (maceration), making epidermal layers substantially weaker and far more prone to tearing under friction.
Excessive Grip Pressure: Over-gripping the handle—often referred to as the "death grip"—creates excessive downward and lateral pressure on the palm and fingers, accelerating skin layer separation.
Poor Technique: Inappropriate form, such as an improper grip or feathering with the outside hand in sweep rowing, adds uneven torque and friction that greatly contributes to getting blisters.
Environmental Factors: Cold weather causes skin to crack, while hot weather increases sweating. Additionally, wooden oars, rubber grips, and synthetic handles all interact differently with human skin.

Can Rowers Prevent Blisters?
While complete immunity to blisters is nearly impossible—especially during early spring training or high-mileage water camps—you can dramatically reduce their frequency and severity. Prevention comes down to skin conditioning, grip and feathering technique, and moisture management.
The Golden Rule of Callus Management: Healthy rowers do not aim for smooth hands; they aim for tough, flat calluses. Raised, rough, or overgrown calluses act as levers during the stroke, catching on the oar handle and tearing off at the base (creating painful "raw spots"). Use a pumice stone or callus file after showering to keep calluses smooth and flush with the surrounding skin.
Proper Grip and Where Blisters Should (and Shouldn't) Occur
Your hands are your physical connection to the boat's propulsion. Where blisters form on your hands reveals key insights into your grip mechanics and feathering technique:
Ideal Blister & Callus Locations
In addition to grip mechanics and feathering technique, the location of blisters and calluses also depends on hand size and oar handle dimensions. Ideally, friction should be distributed across the fingers rather than the palm:
Distal Finger Joints: Under the first and second phalanges, where the fingers curl over the top of the handle.
Base of the Fingers & Upper Palm: Where the fingers meet the palm (MCP joints). Indicates a relaxed "hook" grip where force is transferred through structure rather than squeezing muscle.
Problematic Blister Locations
Center of the Palm: Indicates over-gripping or carrying the handle too deep in the hand. It is also caused by pivoting hands on the handle, which is common in rowers at the finish position.
Inside of the Thumbs: Caused by improper hand placement and/or pressing the thumbs too hard against the handle.
Grip Mechanics & Feathering Technique
Finger Placement & Hook Grip: Position your fingers over the top of the handle and curl them to create a relaxed "hook". The vast majority of contact between your hand and the handle should occur through your fingers rather than your palm.
Thumb Positioning: Rest your thumb lightly underneath or against the handle to maintain control during the catch and the finish of the stroke.
Relaxed Hold: Avoid squeezing the handle tightly at any point during the stroke.
Feathering in Sculling: Use your fingers primarily to roll the handle, and avoid changing your hand position and contact points.
Feathering in Sweep Rowing: Use your inside hand exclusively to roll the handle while the handle spins smoothly inside your outside hand, which remains loosely wrapped around it. Always maintain your original hand placement and contact points.

Immediate Treatment: The "To Pop or Not" Debate
Once a blister appears, correct care dictates how quickly you can return to full training capacity while avoiding infection.
Intact (Unbroken) Blisters
If a blister is small, painless, and intact, do not pop it. The overlying skin acts as a sterile biological bandage that protects the raw layer underneath from bacteria present in boathouse environments and natural waterways.
Large or Painful Pressure Blisters
If a blister is large, tense, and hurts whenever you grasp an oar, leaving it intact risks an uncontrolled, jagged tear while rowing. Controlled drainage is the best solution:
Sterilize: Wash your hands thoroughly with warm water and antibacterial soap. Clean a fine needle with rubbing alcohol or flame.
Drain at the Base: Carefully puncture the edge near the bottom of the blister. Gently push out fluid using a clean cotton swab while leaving the roof flap intact.
Protect: Apply an antiseptic ointment (such as Bacitracin or Neosporin) and cover with a sterile non-stick bandage.
Infection Warning: Open-water rowing exposes raw skin to natural river or lake water containing bacteria. Watch for red streaks, swelling, throbbing pain, warmth, or yellow pus. If any of these occur, consult a medical professional immediately.
Proper Care for Blisters and Calluses
Long-term hand health requires a consistent daily care routine off the water. Treating your skin after workouts ensures calluses remain smooth and protective rather than turning into torn skin injuries.

Daily Post-Rowing Care Routine
Hygiene First: Immediately wash your hands with warm water and antibacterial soap after every session on the water to remove river microbes and sweat buildup.
Filing & Smoothing Calluses: Use a pumice stone or callus file while your hands are still soft after showering. Gently sand down raised edges so calluses remain flush with the surrounding skin. Never use sharp blades or clippers to cut calluses off completely.
Moisturize Strategically: Apply heavy-duty moisturizing balm or ointment (such as Bag Balm, Aquaphor, or thick hand cream) before bed. Keeping calluses pliable prevents them from drying out, cracking, or snapping off under load.
Managing Torn Calluses ("Flappers"): If a callus tears open, wash the raw skin thoroughly, trim away dead dangling skin with clean nail scissors, apply antiseptic cream, and cover with a hydrocolloid bandage overnight.

Taping for the Next Session
Taping protects existing blisters and prevents raw skin from further friction. Improperly applied tape will roll off within three strokes, creating a messy adhesive clump on your oar handle.
How to Apply Rowing Tape Properly:
Clean & Dry First: Wash away oils, chalk, and sweat before applying tape. Ensure skin is completely dry.
Anchor Points: Wrap tape cleanly around the finger or hand without pulling it tight. Never wrap tape so tightly that it restricts circulation or numbs finger tips.
Overlap correctly: Wrap tape in the direction that skin naturally rolls across the handle during the drive phase so the edges don't lift off.
Anchor standard strips: When protecting palm blisters, extend long vertical strips up the fingers and anchor them firmly around the wrist or base of the hand.

Choosing the Right Athletic Tape for Rowing
Not all athletic tapes perform equally when subjected to moisture, water, and high physical stress and friction. While various options are available, based on experience, Nexcare Waterproof tape stands out as a top performer for hand protection in rowing:
Key Qualities: It features a brown, flexible design that reliably holds through the majority of practice.
On-the-Water Preparedness: Bringing a roll in the boat allows for quick re-taping if the material rips during a session.
Availability: Generic alternatives can easily be found at pharmacies such as CVS or Walgreens.
Selection Criteria: While other market options exist, always ensure the tape you choose is waterproof, flexible, and capable of staying firmly in place on hands and fingers without folding or tearing.

Can wearing gloves in rowing help with blisters?
The use of gloves is a widely debated topic in the rowing community. While elite and high-performing rowers typically avoid them to maintain direct tactile feedback with the oar, recreational and novice rowers may decide to utilize them to protect tender hands while building up their calluses and refining their grip mechanics.
The Case Against Gloves
Traditional rowers generally advise against gloves for technical and practical reasons:
Loss of Handle Feel: Gloves reduce tactile feedback and sensitivity to blade angle during feathering and squaring.
Slippage & Bunching: Wet gloves tend to stretch, slide, and bunch up in the palm. They also make hands sweat more, which altogether can actually create more friction and worse blisters than bare hands.
Culture: Rowing tradition emphasizes building natural calluses as a fundamental requirement of the sport.
When Gloves Make Sense
Despite tradition, specialized rowing gloves (such as lightweight, fitted silicone-grip rowing gloves) can serve specific purposes:
Extreme Cold Weather: Winter training on open water where freezing conditions put fingers at risk of frostbite or severe cracking.
Dermatological Conditions: Athletes with thin skin, eczema, or medical conditions that prevent callus formation.
Novice Transition Period: Helping brand-new rowers transition into high-volume training without suffering severe skin tears during their first few weeks.
IF YOU CHOOSE TO ROW WITH ROWING GLOVES:
Not all gloves are the same. If you decide to use gloves to protect your hands while rowing, look for lightweight, open-finger options.
Specialized Designs: Products like Crew Stop gloves are specifically engineered for rowing.
Performance & Testimonials: Although personal experience with them may vary, online testimonials indicate that these specialized gloves perform well under certain conditions and offer reliable hand protection.


Comments